The Journey of a Thousand Miles Must Begin With a Single Step - Lao Tzu
02/03/2011 - Intro
Journal #1
Today I had my first meeting with my supervisor (Mr. Cusbert) as we went over what needed to be done and the date at which phase one of the project has to be finished by which is Friday, March 11. As well Dean has just confirmed the date of our flights when we will be flying down to the Factory Five build shop and building an Mk4 Roadster with a group of about 10-12 people I think. I am looking forward to learning all about the mechanics of cars and building one myself. For now I am going to start attacking this project by splitting the car into 5 different sections, so it is easier for me to understand the different systems of a car. I don’t know yet what those sections will be and which part of the car will fall under each section but as I begin my research I will soon know the answer to that question.
Today I had my first meeting with my supervisor (Mr. Cusbert) as we went over what needed to be done and the date at which phase one of the project has to be finished by which is Friday, March 11. As well Dean has just confirmed the date of our flights when we will be flying down to the Factory Five build shop and building an Mk4 Roadster with a group of about 10-12 people I think. I am looking forward to learning all about the mechanics of cars and building one myself. For now I am going to start attacking this project by splitting the car into 5 different sections, so it is easier for me to understand the different systems of a car. I don’t know yet what those sections will be and which part of the car will fall under each section but as I begin my research I will soon know the answer to that question.
07/03/2011 - Engine Decisions
Journal #2
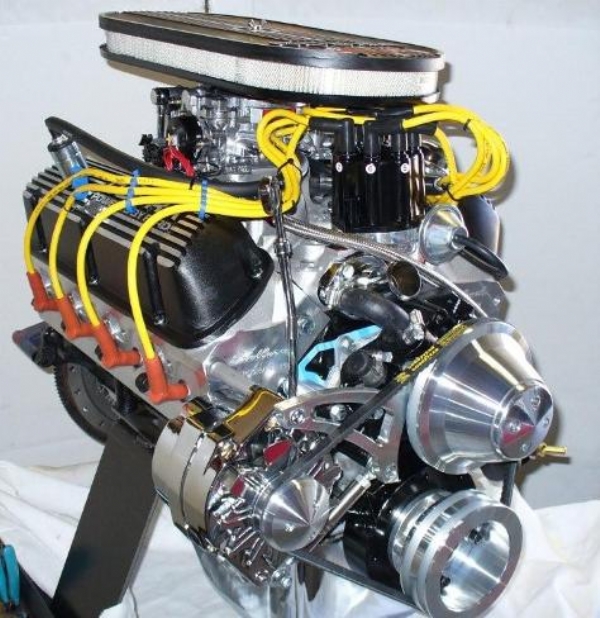
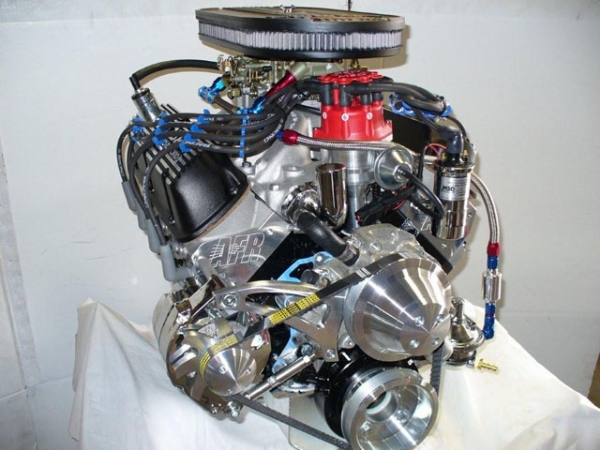
Over the past week or so Dean and I have been deciding on the different options we have been given to customize our car. For example instead of the standard black metal roll bars we have upgraded to the chrome coated roll bars behind the driver’s seat. We have to decide on the specifications now because The Factory Five Company has to make the cutouts for our choices. On a more important note we have to decide upon our engine size. Our two choices are a 302 and a 351. These numbers mean how many cubic inches of all cylinders of the engine combined. Generally the higher cubic inches more horse power. (Below are the two engine choices, 302 on the left and the 351 on the right.) The 302 engine delivers 350 HP (Horse Power) and the 351 engine delivers 435 HP (Horse Power), the 302 is more an everyday driving style engine but still has a lot of "Kick". The 351 engine is usually a "street performance" engine with a bit more "get up and go power." Going forward I will continue to find the answers to my questions. As well I look forward to the course and researching some more about the different systems within a car.
Over the past week or so Dean and I have been deciding on the different options we have been given to customize our car. For example instead of the standard black metal roll bars we have upgraded to the chrome coated roll bars behind the driver’s seat. We have to decide on the specifications now because The Factory Five Company has to make the cutouts for our choices. On a more important note we have to decide upon our engine size. Our two choices are a 302 and a 351. These numbers mean how many cubic inches of all cylinders of the engine combined. Generally the higher cubic inches more horse power. (Below are the two engine choices, 302 on the left and the 351 on the right.) The 302 engine delivers 350 HP (Horse Power) and the 351 engine delivers 435 HP (Horse Power), the 302 is more an everyday driving style engine but still has a lot of "Kick". The 351 engine is usually a "street performance" engine with a bit more "get up and go power." Going forward I will continue to find the answers to my questions. As well I look forward to the course and researching some more about the different systems within a car.
08/03/2011
Introduction & Overview of the Factory Five Mk4 Roadster
This You Tube video really helped me know what the Mk4 Roadster is all about and is a good overview of what the Factory Five Company is all about and how reliable they are for their products and services.
30/03/2011 - Project Extension
Journal #3
Today I met briefly with Mr. Cusbert as he looked over my progress on my website and other parts of my project. He has given me and extension until May 20th for “Phase 2” because the build school is a vital part to my research, as well as the “Intro” lessons Dean will give me approaching the build course date. For my plan, I have mostly finished pushing out the few minor details that I don’t know about yet. Because this project is so big it is hard to plan when we will do things and when parts, etc. will arrive, but "Phase 1" is pretty much complete.
Today I met briefly with Mr. Cusbert as he looked over my progress on my website and other parts of my project. He has given me and extension until May 20th for “Phase 2” because the build school is a vital part to my research, as well as the “Intro” lessons Dean will give me approaching the build course date. For my plan, I have mostly finished pushing out the few minor details that I don’t know about yet. Because this project is so big it is hard to plan when we will do things and when parts, etc. will arrive, but "Phase 1" is pretty much complete.
28/04/2011 - Build School
Wake up at some ungodly hour in the morning and drive to Vancouver International Airport to board our flight to Grand Rapid, Michigan.
Arrive in Grand Rapids, Michigan around 1 in the afternoon. Have lunch with friends and drive to Howell, Michigan about an hour away and check into our hotel for the next 3 nights.
Arrive in Grand Rapids, Michigan around 1 in the afternoon. Have lunch with friends and drive to Howell, Michigan about an hour away and check into our hotel for the next 3 nights.
29/04/2011 - Build School
Journal #4
Build School at Mott Community College.
Refer to build school page.
Build School at Mott Community College.
Refer to build school page.
30/04/2011 - Build School
Journal #5
Build School at Mott Community College.
Refer to build school page.
Build School at Mott Community College.
Refer to build school page.
1/05/2011 - Build School
Journal #6
Build School at Mott Community College.
Refer to build school page.
Drive back to Grand Rapids, Michigan. Have dinner with friends. Check into hotel.
Build School at Mott Community College.
Refer to build school page.
Drive back to Grand Rapids, Michigan. Have dinner with friends. Check into hotel.
2/05/2011 - Build School
Journal #7
Board plane back to Vancouver in the morning, arrive in Vancouver around 8 at night.
End of our Build School experience.
Board plane back to Vancouver in the morning, arrive in Vancouver around 8 at night.
End of our Build School experience.
24/05/2011 - Crate Arrives (1.5h)
Journal #8
Today was a very big day after about a month of waiting the crate arrived at our door step. Although it wasn't to easy to get into our garage as I live in a large condo. First it took two tow trucks to back it up our drive way and get it to the main gate. The whole process took just less than an hour before they left. I really just wanted to take a sludge hammer to the plywood and open the thing when I saw it, it was like Christmas all over again. I filmed the whole thing but decided it was to boring to watch so I just took snapshots of the film and put them into the slide show below. Once the Crate was int the garage and the tow trucks had left, Dean and I started to take the pry bar to the plywood. It wasn't so easy, somebody obviously went to town with the nail gun when they were putting this thing together, because it must have taken us at least 10 min to get the top of the crate off. But nothing is going to stop us from getting this thing open. When we first took the lid off it was like heaven until we realized there were a lot of boxes and we still had to build the thing. But it all takes time.
Today was a very big day after about a month of waiting the crate arrived at our door step. Although it wasn't to easy to get into our garage as I live in a large condo. First it took two tow trucks to back it up our drive way and get it to the main gate. The whole process took just less than an hour before they left. I really just wanted to take a sludge hammer to the plywood and open the thing when I saw it, it was like Christmas all over again. I filmed the whole thing but decided it was to boring to watch so I just took snapshots of the film and put them into the slide show below. Once the Crate was int the garage and the tow trucks had left, Dean and I started to take the pry bar to the plywood. It wasn't so easy, somebody obviously went to town with the nail gun when they were putting this thing together, because it must have taken us at least 10 min to get the top of the crate off. But nothing is going to stop us from getting this thing open. When we first took the lid off it was like heaven until we realized there were a lot of boxes and we still had to build the thing. But it all takes time.
26/05/2011 - Unpacking & Inventory (2.5h)
Journal #9
Today after we unpacked all of the boxes from the crate and had the crate disposed of we began our inventory because as I made not of before it is very important for us to be organized and know which parts we have and which parts we don't. This will also help us greatly when we need to find a part, we can just look at the sheet and it will tell us which box the part we are looking for is in so we don't have to look through ever box and rip apart the garage. Once we had marked off all of the parts that we didn't get and placed them on back order we can start to piece together the car and see what the next step in the manual is but we will save that for another day. We spent approximately 2 1/2 hours working today.
Today after we unpacked all of the boxes from the crate and had the crate disposed of we began our inventory because as I made not of before it is very important for us to be organized and know which parts we have and which parts we don't. This will also help us greatly when we need to find a part, we can just look at the sheet and it will tell us which box the part we are looking for is in so we don't have to look through ever box and rip apart the garage. Once we had marked off all of the parts that we didn't get and placed them on back order we can start to piece together the car and see what the next step in the manual is but we will save that for another day. We spent approximately 2 1/2 hours working today.
28/05/2011 - Body Off (1h)
Journal #10
Today we removed the body from the frame but before doing this we had to remove the vintage jacks which are mounted on the body in the front and back just below the lights. Originally they were used to lift the car up quickly to switch the tires when in a race but are now just for show. They are a bit tricky to put back on because they are each cut at a different angle to compensate for the body so the sit straight. Next I got to use our new dolly to unscrew the two screws which hold the bottom of the body to the frame. Next by using the measurements of the body Dean cut a 2x4 to fit from the dash board to the back of the seating area to prevent the body from collapsing on itself when we lifted it off of the frame. Next I asked my mom (Jay Lynne Fleming) to help us take the body of and place it on the body buck. This is because the body has to be pulled out from the sides and with one person at the front and one at the back we had no one to pull the sides out and up but now we did and so we got the body off swiftly and smoothly and placed it on the buck with no problem. There are pictures of us doing this below. This part didn't take us very long but we did read through the manual to see what was next so it only took us about an hour of work today.
Today we removed the body from the frame but before doing this we had to remove the vintage jacks which are mounted on the body in the front and back just below the lights. Originally they were used to lift the car up quickly to switch the tires when in a race but are now just for show. They are a bit tricky to put back on because they are each cut at a different angle to compensate for the body so the sit straight. Next I got to use our new dolly to unscrew the two screws which hold the bottom of the body to the frame. Next by using the measurements of the body Dean cut a 2x4 to fit from the dash board to the back of the seating area to prevent the body from collapsing on itself when we lifted it off of the frame. Next I asked my mom (Jay Lynne Fleming) to help us take the body of and place it on the body buck. This is because the body has to be pulled out from the sides and with one person at the front and one at the back we had no one to pull the sides out and up but now we did and so we got the body off swiftly and smoothly and placed it on the buck with no problem. There are pictures of us doing this below. This part didn't take us very long but we did read through the manual to see what was next so it only took us about an hour of work today.
1/06/2011 - "F" Panels On (1h)
Journal # 11
Today we spent about an hour getting the feel of riveting. As well as drilling through the frame by installing the F panels which go just behind the front suspension on the left and right side of the car. I found this to be a good insight to what is in my future of the thousands of holes that have to be drilled not only through the frame but through the sheet metal as well, using the handy drill press. Not to mention the thousands of rivets that go along with all the holes. To prevent rattling and excess noise from all of the panels against the frame we put a thin line of silicone over the holes on the sheet metal which also gives it a stronger hold and a better seal to the frame. After just the first two panels I was so glad that we bought the air gun riveter. It will save us a lot of time. Overall a short but informative day.
Today we spent about an hour getting the feel of riveting. As well as drilling through the frame by installing the F panels which go just behind the front suspension on the left and right side of the car. I found this to be a good insight to what is in my future of the thousands of holes that have to be drilled not only through the frame but through the sheet metal as well, using the handy drill press. Not to mention the thousands of rivets that go along with all the holes. To prevent rattling and excess noise from all of the panels against the frame we put a thin line of silicone over the holes on the sheet metal which also gives it a stronger hold and a better seal to the frame. After just the first two panels I was so glad that we bought the air gun riveter. It will save us a lot of time. Overall a short but informative day.
11/06/2011 - Sheet Metal (2h)
Journal #12
Today was pretty much the same stuff as the last time. We spent about 2 hours drilling and marking the panels so they can be installed swiftly. It is somewhat irritating because you are doing the same thing over and over again. In short you line the panel up on the frame where it is going to be riveted to take a sharpie and trace the frame lines to the panel. Then you take a pre-made ruler that we got from Factory Five which gives us perfectly spread hole markings for the size of the panel so we don't have to measure the distance of each hole from one to the next. We then take the panel to the drill press where we drill out each hole and if the panel is too hard to fit under the drill press we have to hand drill the holes. Then once all of the holes are drilled we have to go back with a smaller drill and a large shaving drill bit which takes all of the leftover burrs off of the holes so they are smooth and flush for when we rivet the panels to the car. This the point where it is very important to mark each of the panels so when you are stacking them up after drilling the holes you don't have to install them like you are doing a jigsaw puzzle. Thankfully we marked them with precision so we know exactly where they go when we put them back on the frame. Another one of those days where you just have to get the hard stuff done so everything will continue to move swiftly. Dean had a great idea to hook up the action camera that we had just got from the guy that is handling the paperwork for us to create a time-laps video then in the end it will almost look like we built it in 1 day. Instead of it being a constant video we set the camera to take a picture every 30 seconds when we are working on the car. I think it will look great when we finish.
Today was pretty much the same stuff as the last time. We spent about 2 hours drilling and marking the panels so they can be installed swiftly. It is somewhat irritating because you are doing the same thing over and over again. In short you line the panel up on the frame where it is going to be riveted to take a sharpie and trace the frame lines to the panel. Then you take a pre-made ruler that we got from Factory Five which gives us perfectly spread hole markings for the size of the panel so we don't have to measure the distance of each hole from one to the next. We then take the panel to the drill press where we drill out each hole and if the panel is too hard to fit under the drill press we have to hand drill the holes. Then once all of the holes are drilled we have to go back with a smaller drill and a large shaving drill bit which takes all of the leftover burrs off of the holes so they are smooth and flush for when we rivet the panels to the car. This the point where it is very important to mark each of the panels so when you are stacking them up after drilling the holes you don't have to install them like you are doing a jigsaw puzzle. Thankfully we marked them with precision so we know exactly where they go when we put them back on the frame. Another one of those days where you just have to get the hard stuff done so everything will continue to move swiftly. Dean had a great idea to hook up the action camera that we had just got from the guy that is handling the paperwork for us to create a time-laps video then in the end it will almost look like we built it in 1 day. Instead of it being a constant video we set the camera to take a picture every 30 seconds when we are working on the car. I think it will look great when we finish.
27/06/2011 - Front Suspension (3h)
Journal #13
Today we started the front suspension we spent approximately 3 hours doing this. We started by unpacking the boxes and laying everything out on the table. We started by mounting the upper and lower control arms to the frame on the left and right sides. We then assembled the coil over shock which is instead of having the shock absorber and the spring separate the spring rests over the shock absorber. It wasn't to easy to mount the coil over shock because multiple spacers must be implanted in between the frame and the ball joint on the top and bottom of the coil over shock so the bolt will fit snug in the frame. We had a bit of trouble trying to get the snap rings off of the shock absorber to fit the adjustment casing to loosen or tighten the spring. It was quite frustrating but eventually we got it, and it it working smoothly. We then installed the "disk" portion of the disk brakes to each set of control arms a quick rub of acetone to get the grime off, tighten a couple bolts and we wer done for the day. The car ready for the front brakes tomorrow.
Today we started the front suspension we spent approximately 3 hours doing this. We started by unpacking the boxes and laying everything out on the table. We started by mounting the upper and lower control arms to the frame on the left and right sides. We then assembled the coil over shock which is instead of having the shock absorber and the spring separate the spring rests over the shock absorber. It wasn't to easy to mount the coil over shock because multiple spacers must be implanted in between the frame and the ball joint on the top and bottom of the coil over shock so the bolt will fit snug in the frame. We had a bit of trouble trying to get the snap rings off of the shock absorber to fit the adjustment casing to loosen or tighten the spring. It was quite frustrating but eventually we got it, and it it working smoothly. We then installed the "disk" portion of the disk brakes to each set of control arms a quick rub of acetone to get the grime off, tighten a couple bolts and we wer done for the day. The car ready for the front brakes tomorrow.
28/06/2011 - Front Brakes (2h)
Journal #14
Today we spent about 2 hours working on the front brakes. This was fairly easy because during kind of the research portion of the project before we left to go to the build school we replaced the rear brake pads on Dean's Jeep. We started by unpacking the Brake pads, hardware and calibers themselves. The front brakes are much larger than the rear brakes as the have 2 pistons instead of just one because when a car stops all of the motion going forward would tear smaller brakes. We placed the pads inside the slots. The tricky part was folding over the rubber seal cap from the mounting rods to the point where the fluid enters because it kept popping off the lip when we moved it. Eventually I got it and we greased the mounting rods and mounted the brakes over the disks and to the frame which was fairly straight forward. That was our main objective for the day and we completed it.
Today we spent about 2 hours working on the front brakes. This was fairly easy because during kind of the research portion of the project before we left to go to the build school we replaced the rear brake pads on Dean's Jeep. We started by unpacking the Brake pads, hardware and calibers themselves. The front brakes are much larger than the rear brakes as the have 2 pistons instead of just one because when a car stops all of the motion going forward would tear smaller brakes. We placed the pads inside the slots. The tricky part was folding over the rubber seal cap from the mounting rods to the point where the fluid enters because it kept popping off the lip when we moved it. Eventually I got it and we greased the mounting rods and mounted the brakes over the disks and to the frame which was fairly straight forward. That was our main objective for the day and we completed it.
04/07/2011 - Rear Differential, Brakes & 3 link Suspension (4h)
Journal #15
Since it has been a couple days since we last did work on the car we decided to make a dent and get the rear differential, brakes and 3 link suspension done. We finished in about 4 hours or so. Firstly you had to take a part the rear differential to replace a "C" clip within the gears and so because it was more so a one man job and was slightly complicated dean took over. Once that was finished and the backing plate was bolted back on we started by filling the rear differential with grease so the gears will turn smoothly. We then mounted the rear differential to the frame with some serious sized bolts. We used the jack to help us raise it to the brackets where it bolts to because it was fairly heavy to lift even with 2 people. Then we moved on to the 3 link suspension, they call it that because it is connected to the frame in 3 different places. This includes the panhard bar which stops the side to side movement of the car when cornering. Without it the rear end of the car would crush itself. Then there is the main up and down shock absorbers which attach to the frame like the front suspension. Installing the 3 link suspension was fairly easy because all it took was 3 very large bolts to go through the frame. The only tricky part was getting the spacers to fit properly because it was a very tight fit. All of the suspension components must be set to the right length for it the function to its full capacity. Lastly we moved on to the rear brakes and like the front brakes, installed the disks on both sides. Then placed the brake pads within the calibers and inserted the mounting rods which the sealers had to be attached to like the front brakes but i had an easier time with these ones. We mounted the calibers to the frame and around the disks, and that pretty much summed up the days' work.
Since it has been a couple days since we last did work on the car we decided to make a dent and get the rear differential, brakes and 3 link suspension done. We finished in about 4 hours or so. Firstly you had to take a part the rear differential to replace a "C" clip within the gears and so because it was more so a one man job and was slightly complicated dean took over. Once that was finished and the backing plate was bolted back on we started by filling the rear differential with grease so the gears will turn smoothly. We then mounted the rear differential to the frame with some serious sized bolts. We used the jack to help us raise it to the brackets where it bolts to because it was fairly heavy to lift even with 2 people. Then we moved on to the 3 link suspension, they call it that because it is connected to the frame in 3 different places. This includes the panhard bar which stops the side to side movement of the car when cornering. Without it the rear end of the car would crush itself. Then there is the main up and down shock absorbers which attach to the frame like the front suspension. Installing the 3 link suspension was fairly easy because all it took was 3 very large bolts to go through the frame. The only tricky part was getting the spacers to fit properly because it was a very tight fit. All of the suspension components must be set to the right length for it the function to its full capacity. Lastly we moved on to the rear brakes and like the front brakes, installed the disks on both sides. Then placed the brake pads within the calibers and inserted the mounting rods which the sealers had to be attached to like the front brakes but i had an easier time with these ones. We mounted the calibers to the frame and around the disks, and that pretty much summed up the days' work.
07/07/2011 - Fire wall/Driver Foot-box & Gas Tank (3h)
Journal # 16
Today we spent about 3 hours drilling and riveting the driver side foot-box/firewall which was slightly difficult because there was a lot of holes to be drilled from underneath the frame which is sore on the arms after a while but eventually we got it done and the first few panels mounted on which I already explained how we put them on. On the floor panel we coated the bottom with a rough black tar like finish to protect it from rocks, dirt and other things on the road. Although drilling and riveting panels is easy it is very time consuming. Once that was done we moved on to trying to mount the gas tank. We fussed with it for a while because after we mounted the steel strapping harness for the gas tank we realized that the straps didn't align with the groves that we in the bottom of the gas tank. So after about 15 minutes of not coming up with anything, I went up and started to write more of this process journal and dean stayed and tried to figure out what was wrong. Finally Dean got it to fit and we just had to call it a day because it was quite frustrating trying to figure out what was going on. I definitively learned that sometimes you need to adjust parts or hardware yourself to make them work when you are building a car.
Today we spent about 3 hours drilling and riveting the driver side foot-box/firewall which was slightly difficult because there was a lot of holes to be drilled from underneath the frame which is sore on the arms after a while but eventually we got it done and the first few panels mounted on which I already explained how we put them on. On the floor panel we coated the bottom with a rough black tar like finish to protect it from rocks, dirt and other things on the road. Although drilling and riveting panels is easy it is very time consuming. Once that was done we moved on to trying to mount the gas tank. We fussed with it for a while because after we mounted the steel strapping harness for the gas tank we realized that the straps didn't align with the groves that we in the bottom of the gas tank. So after about 15 minutes of not coming up with anything, I went up and started to write more of this process journal and dean stayed and tried to figure out what was wrong. Finally Dean got it to fit and we just had to call it a day because it was quite frustrating trying to figure out what was going on. I definitively learned that sometimes you need to adjust parts or hardware yourself to make them work when you are building a car.
08/07/2011 - Gas Tank (1.5h)
Journal #17
A short day today but another frustrating one. We successfully mounted the gas tank but when we went to put the valves on for the fuel lines the nozzle wouldn't tighten properly because it was hitting the frame. After about an hour and a half or so of bending the tabs which lock the valve system in place, then having to seal it with makeshift tools because it would be loose if we just left it, we finally got it to fit with enough space to fit the fuel lines. What was supposed to be a quick little install of the gas tank turned into a major headache but we overcame it and made everything work.
A short day today but another frustrating one. We successfully mounted the gas tank but when we went to put the valves on for the fuel lines the nozzle wouldn't tighten properly because it was hitting the frame. After about an hour and a half or so of bending the tabs which lock the valve system in place, then having to seal it with makeshift tools because it would be loose if we just left it, we finally got it to fit with enough space to fit the fuel lines. What was supposed to be a quick little install of the gas tank turned into a major headache but we overcame it and made everything work.
09/07/2011 - Battery Drop Box (1h)
Journal #18
I was away today but Dean figured out how to give us more room in the truck with the limited space we already have. The instructor at the build course told us that it would be a good idea to make a different spot to put your battery because it took up valuable space in the trunk. The instructor put his drop box in some empty space next to the engine. Dean saw a good idea to put it in some unused space below the back of the trunk so it is still easy to access but is out of the way. Installing the drop box is fairly simple the box itself comes pre-assembled all Dean had to do was create a mounting bracket and drill into the frame then rivet in place. A simple solution to a minor flaw in the design.
I was away today but Dean figured out how to give us more room in the truck with the limited space we already have. The instructor at the build course told us that it would be a good idea to make a different spot to put your battery because it took up valuable space in the trunk. The instructor put his drop box in some empty space next to the engine. Dean saw a good idea to put it in some unused space below the back of the trunk so it is still easy to access but is out of the way. Installing the drop box is fairly simple the box itself comes pre-assembled all Dean had to do was create a mounting bracket and drill into the frame then rivet in place. A simple solution to a minor flaw in the design.
10/07/2011 - Passenger Foot-Box (2.5h)
Journal #19
Another time consuming day installing the passenger side foot-box and seating panels. I wont go into to much detail because it is the exact same as the other panels. We marked and drilled the holes into the frame while we did some touch ups to the tar like coating that we put on the bottom of the foot box just like the driver's side. We spent about 2 and a half hours drilling and riveting and we still weren't finished . So we will leave the rest for tomorrow.
Another time consuming day installing the passenger side foot-box and seating panels. I wont go into to much detail because it is the exact same as the other panels. We marked and drilled the holes into the frame while we did some touch ups to the tar like coating that we put on the bottom of the foot box just like the driver's side. We spent about 2 and a half hours drilling and riveting and we still weren't finished . So we will leave the rest for tomorrow.
11/07/2011 - Passenger Foot-Box (1h)
Journal #20
We spent only about an hour and a half or so finishing up riveting the panels to the frame. Then we polished some panels that you would see from under the hood so they look nice when the car is finished. Slowly but surely the car is coming along.
We spent only about an hour and a half or so finishing up riveting the panels to the frame. Then we polished some panels that you would see from under the hood so they look nice when the car is finished. Slowly but surely the car is coming along.
16/07/2011 - Brake Lines (4h)
Journal #21
As this part of the car it very important and can be very difficult and stressful to do Dean took over as I was away. It took about 4 hours to find the right length of rod and bend it along the frame from the brake calibers to the master cylinder which we haven't installed yet but it sits on the frame above the driver's side foot-box as it a part of the pedal box assembly. To bend the brake lines one of the easier ways is to use a vice mounted to a work bench and a socket, the size depending on how tight the bend is but the smaller socket you use the more likelihood of you kinking the line and then you have to start all over again with a new line. We used 5 separate lines to complete all four brakes, 2 in the front and 3 lines in the back. If you find the right length of line and bend it to the frame properly to start with you won't have to cut the line and flare the end of it to attach another line to which is another painstaking job if you don't get it right the first time. Fortunately Dean only had to do one flare at the rear to connect two brake lines which he did perfectly and there was no problem. For some people this job can be very overwhelming and very time consuming. Eventually without too much trouble Dean fit all of the lines along the frame and to the brakes calibers properly. Dean was done for the day after he mounted the brake lines to the frame, not looking forward to bleeding the brakes where we make sure all of the connections don't leek. Next to finish we just have to mount the pedal box and reservoirs then bleed the brakes to make sure there is no air left in the lines.
As this part of the car it very important and can be very difficult and stressful to do Dean took over as I was away. It took about 4 hours to find the right length of rod and bend it along the frame from the brake calibers to the master cylinder which we haven't installed yet but it sits on the frame above the driver's side foot-box as it a part of the pedal box assembly. To bend the brake lines one of the easier ways is to use a vice mounted to a work bench and a socket, the size depending on how tight the bend is but the smaller socket you use the more likelihood of you kinking the line and then you have to start all over again with a new line. We used 5 separate lines to complete all four brakes, 2 in the front and 3 lines in the back. If you find the right length of line and bend it to the frame properly to start with you won't have to cut the line and flare the end of it to attach another line to which is another painstaking job if you don't get it right the first time. Fortunately Dean only had to do one flare at the rear to connect two brake lines which he did perfectly and there was no problem. For some people this job can be very overwhelming and very time consuming. Eventually without too much trouble Dean fit all of the lines along the frame and to the brakes calibers properly. Dean was done for the day after he mounted the brake lines to the frame, not looking forward to bleeding the brakes where we make sure all of the connections don't leek. Next to finish we just have to mount the pedal box and reservoirs then bleed the brakes to make sure there is no air left in the lines.
25/07/2011 - Organizing Electrical (1h)
Journal #22
Today we only spent about an hour unpacking and sorting out the electrical. We had to start somewhere on what we believe to be the most difficult job. We laid the very multi-colored wiring harness on the workbench and began to go through each wire reading what it was for and if we didn't need it we would mark it to be cut, for example electric widows which we don't have on the car. We organized which bunch of wires went to the front of the car, to the engine or to the dashboard for some examples. It wasn't much but it was something done, so we could feel good about that.
Today we only spent about an hour unpacking and sorting out the electrical. We had to start somewhere on what we believe to be the most difficult job. We laid the very multi-colored wiring harness on the workbench and began to go through each wire reading what it was for and if we didn't need it we would mark it to be cut, for example electric widows which we don't have on the car. We organized which bunch of wires went to the front of the car, to the engine or to the dashboard for some examples. It wasn't much but it was something done, so we could feel good about that.
07/08/2011 - Pedal Box (2h)
Journal #23
Today we left the electrical and mounted the pedal box which consists of the master cylinders the brake and the clutch pedals as well we ordered a single jointed aluminum gas pedal to match the brake and clutch pedal instead of staying with the standard black double jointed pedal. Which looks much nicer. We had to assemble most of the pedal box which we did fairly swiftly; mounting the pedals and clutch cable to their proper positions, we then drilled six separate holes into the frame and bolted the pedal box to the frame on the driver's side foot box. This took us about 2 hours without any major problems.
Today we left the electrical and mounted the pedal box which consists of the master cylinders the brake and the clutch pedals as well we ordered a single jointed aluminum gas pedal to match the brake and clutch pedal instead of staying with the standard black double jointed pedal. Which looks much nicer. We had to assemble most of the pedal box which we did fairly swiftly; mounting the pedals and clutch cable to their proper positions, we then drilled six separate holes into the frame and bolted the pedal box to the frame on the driver's side foot box. This took us about 2 hours without any major problems.
10/08/2011 - Brake Lines Final Hookups & Line Lock Install (2h)
Journal #24
Today we did the final hook ups for the brake lines, which took us about 2 hours. We also installed our specially ordered line lock kit. This mechanism when a switch is flipped on the dashboard locks the front brakes, which is good for doing burnouts or warming up the tires before and drag race, this is one of my favourite extras we have put on the car. We also bought a missile launch switch so it looks dangerous on the dashboard. We then hooked up the front and rear brake lines to the master cylinder which was very simple, we just made sure there was a snug fit and tightened the fastening strap. We also tightened all of the fastenings to the brake calibers on all four brakes. The Brake lines are ready to be bleed after we hook up the reservoirs which we didn't have time to do today.
Today we did the final hook ups for the brake lines, which took us about 2 hours. We also installed our specially ordered line lock kit. This mechanism when a switch is flipped on the dashboard locks the front brakes, which is good for doing burnouts or warming up the tires before and drag race, this is one of my favourite extras we have put on the car. We also bought a missile launch switch so it looks dangerous on the dashboard. We then hooked up the front and rear brake lines to the master cylinder which was very simple, we just made sure there was a snug fit and tightened the fastening strap. We also tightened all of the fastenings to the brake calibers on all four brakes. The Brake lines are ready to be bleed after we hook up the reservoirs which we didn't have time to do today.
12/08/2011 - Reservoir Installation (2h)
Journal #25
Today was fairly simple as we only took 2 hours to mount the two reservoirs to the back side of the dash in the engine bay. They were mostly pre-assembled we just had to mount them to the sheet metal. The mounting was a bit tricky but a simple fix.. Everything looked good so far but we waited to hook up the hoses to the master cylinders until we are going to bleed the brakes which is the next thing we are going to do.
Today was fairly simple as we only took 2 hours to mount the two reservoirs to the back side of the dash in the engine bay. They were mostly pre-assembled we just had to mount them to the sheet metal. The mounting was a bit tricky but a simple fix.. Everything looked good so far but we waited to hook up the hoses to the master cylinders until we are going to bleed the brakes which is the next thing we are going to do.
14/08/2011 - Reservoir Hook-up & Bleeding Brakes (2.5h)
Journal #26
Today we hooked up to reservoirs to the master cylinders and there seems to be no leaks so far. We topped the reservoirs off with the brake fluid and began to bled the brakes. Bleeding went very smoothly as we got all of the air out of the lines without any leaks, until we finished bleeding the 3rd brake caliber and realized the Line lock which we had installed so it automatically locks the front brakes to do burn outs with with the flick of a switch was leaking. We examined the connections and determined that the leak was coming from inside the mechanism and so we had to detach it and replace it. This put our work back until tomorrow.
Today we hooked up to reservoirs to the master cylinders and there seems to be no leaks so far. We topped the reservoirs off with the brake fluid and began to bled the brakes. Bleeding went very smoothly as we got all of the air out of the lines without any leaks, until we finished bleeding the 3rd brake caliber and realized the Line lock which we had installed so it automatically locks the front brakes to do burn outs with with the flick of a switch was leaking. We examined the connections and determined that the leak was coming from inside the mechanism and so we had to detach it and replace it. This put our work back until tomorrow.
15/08/2011 - Line Lock Fix & Bleeding Brakes (2h)
Journal #27
Today dean picked up the new line lock system and we remounted it behind the master cylinders. This time there were no leaks and we finished bleeding the brakes. We rechecked all of the brake calibers just in case the leak had let air into the lines. It appeared that it hadn't so we were good to go. We finished by topping off the master cylinders with brake fluid and did a final check of all the connections for leaks. We were very impressed as the line lock was the only problem we had.
Today dean picked up the new line lock system and we remounted it behind the master cylinders. This time there were no leaks and we finished bleeding the brakes. We rechecked all of the brake calibers just in case the leak had let air into the lines. It appeared that it hadn't so we were good to go. We finished by topping off the master cylinders with brake fluid and did a final check of all the connections for leaks. We were very impressed as the line lock was the only problem we had.
17/08/2011 - Mounting Electrical & Fuse Box (4h)
Journal #28
Today dean mounted the fuse box to the frame in the driver's side foot box pretty much under the steering wheel. This was the second step to the electrical stage as anything to do with electrical is very time wasting. One thing he had to make sure was that each wire was connected to the correct fuse so we weren't hooking up the wrong system to the battery with the wrong fuse in it.
Today dean mounted the fuse box to the frame in the driver's side foot box pretty much under the steering wheel. This was the second step to the electrical stage as anything to do with electrical is very time wasting. One thing he had to make sure was that each wire was connected to the correct fuse so we weren't hooking up the wrong system to the battery with the wrong fuse in it.
18/08/2011 - Electrical Separation & Grouping (4h)
Journal #29
The next step to the electrical was to run the wires to the according sections of the car. E.g. the dash board wires to where the dash board is mounted, the engine wires to the engine and etc. This took a long time because the location of each wire was marked in tiny print on the casing of the wires, thus you had to read each wire to know where it goes, then mount it to the frame as you are running it to its designated location.
The next step to the electrical was to run the wires to the according sections of the car. E.g. the dash board wires to where the dash board is mounted, the engine wires to the engine and etc. This took a long time because the location of each wire was marked in tiny print on the casing of the wires, thus you had to read each wire to know where it goes, then mount it to the frame as you are running it to its designated location.
22/08/2011 - Removing Electrical (1h)
Journal #30
After almost more than 10 hours of dealing with the electrical. Dean decided he had enough of it and ripped all of the wires our of the car. Our dealer who told us that this system would be much simpler and less expensive was dead wrong. So dean called him up and ordered the pre-organized and groupped electrical system, which was $100 more but it will save hours of frustration.
After almost more than 10 hours of dealing with the electrical. Dean decided he had enough of it and ripped all of the wires our of the car. Our dealer who told us that this system would be much simpler and less expensive was dead wrong. So dean called him up and ordered the pre-organized and groupped electrical system, which was $100 more but it will save hours of frustration.
31/08/2011 - Install New Electrical (4h)
Journal #31
Finally our new electrical arrived and all we had to do was mount the fuse box to the same spot on the frame and run the pre bunched wires to their locations. Although simple enough we couldn't trust that all of the wires were hooked up properly so dean took the time to check the fuse box once more and reassure that all of the connections were right.
Finally our new electrical arrived and all we had to do was mount the fuse box to the same spot on the frame and run the pre bunched wires to their locations. Although simple enough we couldn't trust that all of the wires were hooked up properly so dean took the time to check the fuse box once more and reassure that all of the connections were right.
02/09/2011 - Supervisor Visit & Rivet Drop Boxes (2h)
Journal #32
Today was an interesting day and my Personal Project supervisor Mr. Cusbert and one of my other teachers Ms. Roy drove up to my house and came to look at my project. I told them about what we were doing and what is still to be done. Although there is no engine in the car yet, they were very impressed with the work that Dean and I have done. Once we finished our discussion and they had left. I drilled, riveted and siliconed the drop boxes together which drop into the unused spaces of the trunk to give us extra room. This is another feature which you can purchase but is supplied from and aftermarket company, not factory five.
Today was an interesting day and my Personal Project supervisor Mr. Cusbert and one of my other teachers Ms. Roy drove up to my house and came to look at my project. I told them about what we were doing and what is still to be done. Although there is no engine in the car yet, they were very impressed with the work that Dean and I have done. Once we finished our discussion and they had left. I drilled, riveted and siliconed the drop boxes together which drop into the unused spaces of the trunk to give us extra room. This is another feature which you can purchase but is supplied from and aftermarket company, not factory five.
05/09/2011 - Trunk Paneling & Pedal Adjustments (3h)
Journal #33
Today we laid the trunk panels in the truck and placed the drop boxes in and riveted them to the frame for a snug fit. Almost all of the paneling was done now except for a few of the smaller pieces. We also adjusted the pedals to fit Deans height and driving style and where the press pads are located are adjustable due to the very limited space in the foot boxes.
Today we laid the trunk panels in the truck and placed the drop boxes in and riveted them to the frame for a snug fit. Almost all of the paneling was done now except for a few of the smaller pieces. We also adjusted the pedals to fit Deans height and driving style and where the press pads are located are adjustable due to the very limited space in the foot boxes.
13/09/2011 - Side Trunk Paneling (0.75h)
Journal #34
Dean left me a small project to do while he went on a business trip. This was to finish off riveting the side panels of the trunk which gives the body that rounded shape over top the wheel hubs. It went fairly smoothly as it want the first time that I had done paneling like this but it was slightly tricky as the silicon had to be put on both sides of the panel because it fit on the inside of the frame and the outside of the panel that I was attaching it to. Other wise it went good. This also tested my application skills of what I had learned previous to this.
Dean left me a small project to do while he went on a business trip. This was to finish off riveting the side panels of the trunk which gives the body that rounded shape over top the wheel hubs. It went fairly smoothly as it want the first time that I had done paneling like this but it was slightly tricky as the silicon had to be put on both sides of the panel because it fit on the inside of the frame and the outside of the panel that I was attaching it to. Other wise it went good. This also tested my application skills of what I had learned previous to this.
24/09/2011 - Mounted Transmission & Engine Blocks To Engine (2h)
Journal #35
The engine showed up today after it being almost a moth late! After admiring it for 15 min we decided to get to work first we mounted transmission to engine, it ewas tricky because the gears had to line up and lock inside the bell housing which protects you from getting your leg tor to sheds from the clutch exploding. It was a necessary component if we wanted to race the car. Once we tightened those bolts, we began to attach the engine blocks. These are what the engine site on when it is in the car. So instead of bolting the engine right to the frame, you bolt it to these mounts which are then bolted to the frame and that allow the engine to move more freely when it is running. Before tightening the bolts we attached the ground wire from the engine which is braided steel and will connect to the frame when the engine is in place. Lastly we tightened the bolts and all was prepped for us to put the engine in tomorrow.
The engine showed up today after it being almost a moth late! After admiring it for 15 min we decided to get to work first we mounted transmission to engine, it ewas tricky because the gears had to line up and lock inside the bell housing which protects you from getting your leg tor to sheds from the clutch exploding. It was a necessary component if we wanted to race the car. Once we tightened those bolts, we began to attach the engine blocks. These are what the engine site on when it is in the car. So instead of bolting the engine right to the frame, you bolt it to these mounts which are then bolted to the frame and that allow the engine to move more freely when it is running. Before tightening the bolts we attached the ground wire from the engine which is braided steel and will connect to the frame when the engine is in place. Lastly we tightened the bolts and all was prepped for us to put the engine in tomorrow.
25/09/2011 - Engine In & Start To Fit Body (3h)
Journal #36
Today was a big day because we got to put the engine in which we found wan't the easiest thing to do in the world. It took us two tries as the first time the chain was to long and we couldn't get it on enough of and angle to fit under the cross members of the frame. So we dropped it on its stand and took away some chain and this time it worked. Overall it went fairly smoothly with only minor problems, nobody lost a finger which is the good thing. We placed the bolts for the engine blocks into their slots as well as the bolts which attach from the frame to the transmission. We did not tighten them in case we needed to make any adjustments further on. The next thing we did was fill the engine with oil, so we could easily check our modified oil stick measuring tool. We also placed the body on to start the initial fittings and trimming of the body. Some of which we would do and the rest the body shop would do. This included measuring where the hood scoop would fit, making sure the pipes fit snug to the headers without hitting the body, etc.
Today was a big day because we got to put the engine in which we found wan't the easiest thing to do in the world. It took us two tries as the first time the chain was to long and we couldn't get it on enough of and angle to fit under the cross members of the frame. So we dropped it on its stand and took away some chain and this time it worked. Overall it went fairly smoothly with only minor problems, nobody lost a finger which is the good thing. We placed the bolts for the engine blocks into their slots as well as the bolts which attach from the frame to the transmission. We did not tighten them in case we needed to make any adjustments further on. The next thing we did was fill the engine with oil, so we could easily check our modified oil stick measuring tool. We also placed the body on to start the initial fittings and trimming of the body. Some of which we would do and the rest the body shop would do. This included measuring where the hood scoop would fit, making sure the pipes fit snug to the headers without hitting the body, etc.
27/09/2011 - Cut Hood Scoop, Replace Fuel Valve & Mount Overflow Tank (3h)
Journal #37
Today dean cut the hole for the hood scoop out of the hood which wasn't the easiest thing to do as the hood is curved and the engine does not sit exactly in the centre of the car and so you could not line the hole up directly over the air intake because then the scoop wouldn't be centred in the middle of the body. We also replaced our fuel valve because ours was not working properly, but this was a easy fix. Lastly dean mounted the chrome overflow tank which we decided would look the best in front of the engine mounted to one of the cross membranes.
Today dean cut the hole for the hood scoop out of the hood which wasn't the easiest thing to do as the hood is curved and the engine does not sit exactly in the centre of the car and so you could not line the hole up directly over the air intake because then the scoop wouldn't be centred in the middle of the body. We also replaced our fuel valve because ours was not working properly, but this was a easy fix. Lastly dean mounted the chrome overflow tank which we decided would look the best in front of the engine mounted to one of the cross membranes.
28/09/2011 - Install Headers & Tighten Engine and Transmission Mounts (3h)
Journal #38
Today we fit and Installed the headers to the engine which was a very difficult thing to do because the 16 or so bolts are very hard to get to with any tool so you can tighten them. Once both headers were installed it was ridiculous how close they came to the panels of the foot box. Because they came so close we had to move the fuel regulator from where we originally mounted it (on the out side of the passenger side foot box in the engine bay. Because where it was mounted the pipes would most likely over heat the fuel and that would not be good. Although we only moved it half a foot or so it made a big difference. Lastly we tightened the Engine and transmission mounts to the frame, But becasue the transmission was hitting the frame we used a coupple of spacers and raised it up a bit so it sat evenly.
Today we fit and Installed the headers to the engine which was a very difficult thing to do because the 16 or so bolts are very hard to get to with any tool so you can tighten them. Once both headers were installed it was ridiculous how close they came to the panels of the foot box. Because they came so close we had to move the fuel regulator from where we originally mounted it (on the out side of the passenger side foot box in the engine bay. Because where it was mounted the pipes would most likely over heat the fuel and that would not be good. Although we only moved it half a foot or so it made a big difference. Lastly we tightened the Engine and transmission mounts to the frame, But becasue the transmission was hitting the frame we used a coupple of spacers and raised it up a bit so it sat evenly.
- Install Drive Shaft & Hook Up Battery (3.5h)
- Initial Alignment (2h)
Camber Caster and Toe in
- Install Radiator, Air Filter, Filler Neck, Ignition Coil & START THE ENGINE! (3h)
& side pipes
